 -Supplies- -Supplies-
-1 "Innocent" wig in Perky (from
amphigory.com
- this wig is already parted in the back with
a skin part)
-2 packs of Pink Ice silky straight kanekalon
extensions (from doctoredlocks.com)
-Styrafoam Wig Head
-Scissors (nice sharp ones! no dull ones!)
-Got2b hairspray & hairglue (aquanet hairspray
works fine too)
-Flat iron/straightening iron (I use a Revlon
Ceramic plated iron)
-Blow dryer
-Hot glue gun (preferably the one with a high
heat and low heat setting)
-Glue sticks
-Wide toothed comb
-Small travel brush with soft plastic bristles
-Hair elastics (I used the clear ones, you can
buy them at WalMart for a little over a dollar)
-2 styrafoam eggs (I got mine at Micheal's. Use
which ever shape/size you prefer)
-Pins
-Small curlers
-Knife
-Clear caulk
-Teasing Comb
-Razor Hair Cutter (you can get these at Sally's
for a pretty darn good price)
-and lastly... PATIENCE!
First I'd like
to say how big of a project this was for me. Chibiusa
has always been my favorite anime character of
all time. I have never made a wig like this before,
so it was rather frustrating and confusing. That
is why I would like to share it with all of you
so you can skip that feeling of unsureness and
thinking "I can't do that". Yes, you
can. If I can, then you can.
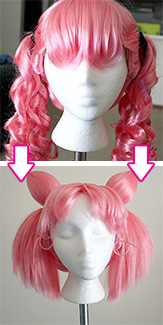
Straightening the Pigtails
 Start
off by pinning your wig securely to the wig head. Start
off by pinning your wig securely to the wig head.
Take one pigtail
and let the hair loose.
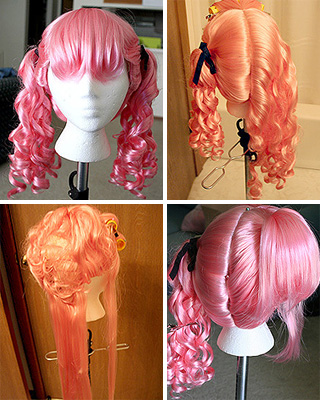
Put your hair straighter
on a low setting and start straightening little
bits at a time. This is very time consuming and
hectic, especially because of those stupid little
curls. I hate curls.
This is one of
the hardest parts ever. It would be easier if
you had a friend or someone to help you with this
step, or else it's going to take a while to do.
So since I straightened out all the hair, it was
REALLY long and kinda fuzzy at the ends. I tried
to put it up in a high pigtail, and it was messy.
So I put it up in a temporary pigtail, cut it
a bit shorter (almost half the original length)
and then undo the pig tail, and put it up again
in a high tight pigtail. I used a small plastic
brush to do this with. Most people won't recommend
brushes, but this worked well. Don't use a big
honkin' brush with metal teeth. Find a small brush,
like a travel one, that has soft plastic bristles.
Then spray the heck out of the pulled hair underneath
the pigtail with hairspray. I used got2b, but
aquanet works fine too.
Repeat for the
other side.
I
let a few bits of hair in the front to add to
the bangs for more coverage on the sides. They
will be cut/trimmed later and used for Chibiusa's
side curls.

Stub Your
Wig
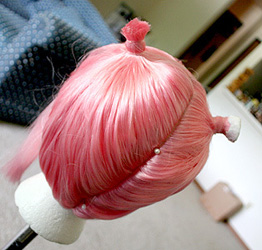 I
was realllly hesitant to cut the cute pigtails
off, but I had to. I used 2 clear elastics to
keep the stubs up and to keep all the fibers even
before I cut them. I
was realllly hesitant to cut the cute pigtails
off, but I had to. I used 2 clear elastics to
keep the stubs up and to keep all the fibers even
before I cut them.
So here you go, stub that mofo.
STUB THAT MOFO GOOD. Make sure to try to make
the hair even at the top of your stub!
Add clear caulk on top of the
stubs. Keep your finger wet while mashing the
caulk into the stub. Make sure you get all around
the stub so it seals up nicely.
You will now have one odd looking
wig. Try not to get too upset that you just cut
those cute little pigtails off that you worked
on so hard to straighten. Just keep thinking to
yourself how awesome its going to look when you
are finally done with it.
... At least that's what I did
when I started to panic.
Making Odango
 For
the odango's fibers to match the wig fibers I
simply used the hair I cut when cutting the pigtail's
length in half. For
the odango's fibers to match the wig fibers I
simply used the hair I cut when cutting the pigtail's
length in half.
Next, get out a large shoe box
lid, extensions, glue gun (on the low heat setting),
glue sticks, little travel brush with plastic
bristles, a steak knife, 2 egg shaped stryafoam
balls, clear hair elastics, clear caulk, scissors,
hairspray, and a disposable chopstick.
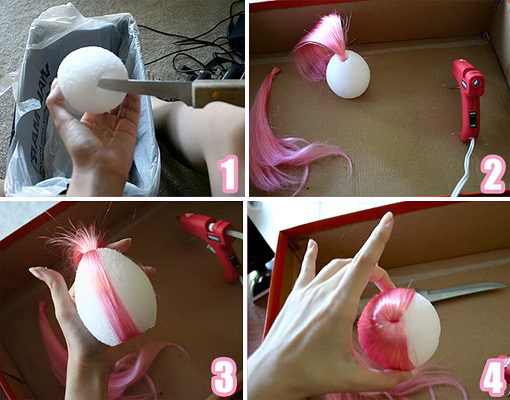
Step 1: Carve
a small whole (about the size of a dime) in the
top of your styrafoam ball using a steak knife,
start spinning the knife in a circular motion,
as you dig down deeper. once you get that one
done, go to the wide part of the styrafoam ball,
and carve a bigger hole, big enough so the stub
of your wig can fit inside. Test them over your
stub once the caulk has dried. You may want to
make it wider if you plan on using the hair tails
of your sailor moon/wicked lady wig to go inside.
I'm using a different method for my chibi moon
pigtails. (To make the hair tails, seal the extensions
similar to what I'm about to do next)
Step 2: Take
your extension hair and rubber band it at the
tip, trim the edges even much like you would when
you stub your wig, then add hot glue to the stubbed
end to seal the hair. After that's done, you want
to add some hot glue to the top of the odango
and stuff that extension in there.
Step 3: Now,
you want to take pieces of the hair and glue them
to the sides of the odango. You do this by taking
your hot glue gun, and gluing a small strip of
glue to the odango, then taking a small section
of your extensions, and laying it on top while
smoothing it out with your fingers. For every
inch of hair that I lay down I use hairspray to
keep it in place. Once I have about an inch width
of hair all glued and hairsprayed down, at the
ends I hot glue them inside the odango. I used
my fingers for this at first to hold the hair
down, but that's a realllly stupid idea as I burned
my thumb. I ended up getting a throw away chopstick
and used that to push the hair down in place.
Step 4: Repeat
step 3 until your odango is completely covered
in hair. My dumbass didn't use enough extension
hair to wrap completely around on my first odango,
so I had ended up stuffing more hair into it to
complete the wrapping. It looks OK, but on the
second set of odango I learned from my mistake.
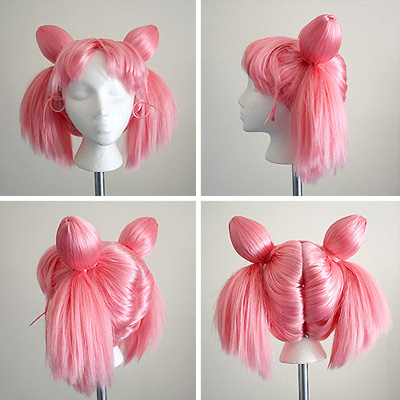
Now you have a lovely set of odango!
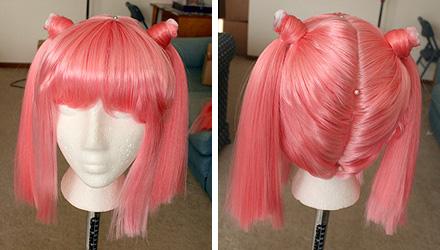
Adding the Pigtails & Styling
This
is exactly what I did for my Chibiusa tails.
If
you have a better method, use it and please share!
I'm not sure if this is the best, but it ended
up working for me.
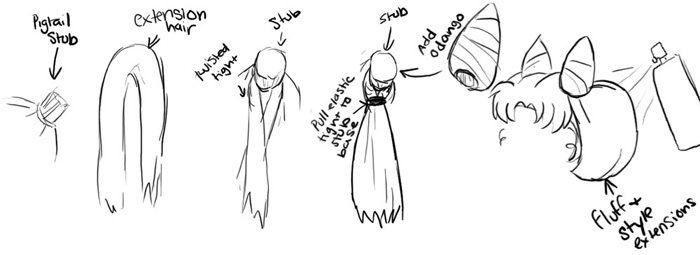
Here's what that looks like IRL:
Hot glue your odango onto the
stubs, and wrap a small piece of the extension
hair around the base and caulk it in place.

Now after that all drys, you want
to style your bangs however which way you like.
I styled mine by splitting the bangs horizontally,
having the top layer or hair pulled back as I
teased and curled the hair underneath. This makes
it work much better since the wig has no skin
top near the bangs. For the curly q's I just used
got2b hair glue and bobby pinned the middle together
and sprayed with hairspray. Once done, I reinforced
the connecting point of the curl with thread and
tied it in a knot. Style your pigtails as you
see fit. I tried several methods, but teasting
worked rather nicely and looked the best.
Big thanks to Charmedseed for her
guide on how she made her sailor moon wig, and
also big thanks to GarnetFlight for sharing her
ideas on how she made her wig.
Hopefully this tutorial is helpful
for you, and that it makes you confident in styling
your own wigs!
|